We all crave for timesaving tricks/tools when at work. This is the reason businesses across the world are on the lookout for solutions that would help their employees execute critical tasks with minimal efforts and in a timesaving manner. This brings into the picture ERP solution that has become a staple for millions of businesses worldwide and Sage 300 Cloud is one such preferred enterprise management systems for a good number of organizations.
What’s new in Sage 300 Cloud?
Often, it is the store person who is delegated with loads of work such as taking into account the inventory details such as physical stocks/materials into the warehouse whilst maintain the same into an ERP system. Further, it becomes all the more tedious and time-consuming if you have barcode on materials and the system lacks the module to track the same.
To overcome this dilemma, Sage Software has come up with barcode scanning functionality to help the end user (i.e. the storekeeper in this context) alleviate their efforts and help them complete the work in no time.
This blog will throw light on the newly incorporated ‘barcode functionality’ in the Inventory module screens. Below is a list of screens that have been newly customized in this context:
– IC Receipt Screen
– IC Shipment Screen
– IC Internal Usage Screen
– IC Transfer Screen
– IC Adjustment Screen
In all the aforementioned screens, functional flow will remain the same for barcode scanning. Let us have a look at the IC Receipt Screens to get a clear picture of this new functionality.
When a user specifies the quantity for a serialized or LOT item in a detail and exits the quantity field, the system will auto pop-up the respective Serial/LOT Numbers Allocation or Generation Screen. You can use it to assign the required serial numbers and/or LOT numbers against the items in the detail’s section.
IC Receipt Screen at a glance:
– To increase inventory stock
– To enter and key-in new receipts for items
– To enter returns and adjustments for incomplete receipts you posted previously
Below is a snapshot of IC Receipt screen for your understanding:
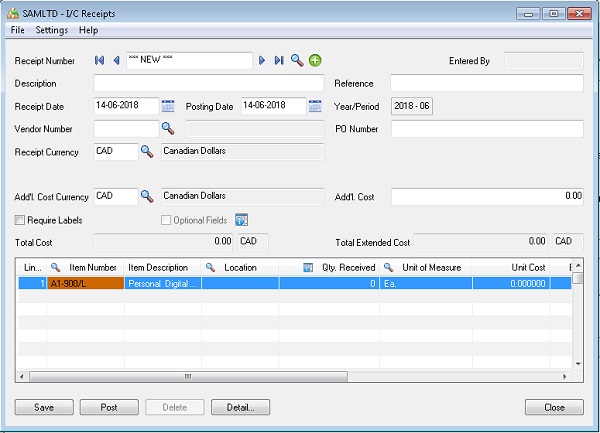
Suppose at the time of creating an IC Receipt Entry, we have item number (A1-900/L) at detail line, then upon clicking F6, the system will genreate the below Window. (Refer Below screen)
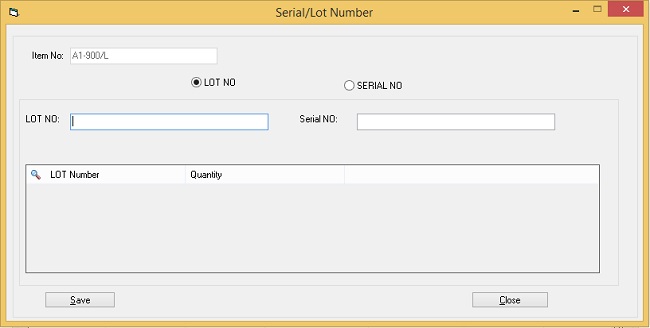
Upon clicking the ‘F6’ button, you will get a window as displayed above with the required details. If the selected item is a combination of the Serial number, the system will enable the serial number textbox. Next, you can scan the item’s serial number and it will be updated under the serial number field, whereas the LOT number textbox will be disabled.
If the selected item is a combination of LOT number, the system will auto enable LOT number textbox and will scan LOT number of the item, which will be updated under the LOT number field, whereas it will disable the Serial number textbox.
Likewise we have customized all the other IC screens to achieve the same. This will greatly help in reducing your efforts particularly the storekeeper’s when keying in system entries.
To know more about barcode scanning in Sage 300 Cloud, contact us here. You can drop us a mail at sale@sagesoftware.co.in for a free demo and/or consultation.